Solution: Individual Stats Missing using WordPress Stats

Around the time that I upgraded this blog to WordPress 3.1.3 with the WordPress.com Stats Plugin version 1.8.1, I began noticing that I could no longer view the stats graph for individual pages properly. My overall site stats still displayed, such as the total Views per day graph of my site, the Top Posts & Pages with correct view counts, etc.

However, when I clicked the small graph icon to view the stats graph for individual posts, I would get a blank graph and the error message “We don’t have that post on record yet” followed by the post id. Similarly, when I logged into wordpress.com to check my blog stats using their interface, the title for the posts would be missing (it would only show the post id followed by “loading title”) and trying to view the stats for individual posts would result in a 403 error.

Almost coincidentally, I was browsing through some of my site logs and noticed a few requests for a file, “xmlrpc.php” in my root directory. I noticed requests for this file coincided with my attempts to view individual stats. As it turns out, xmlrpc.php is a WordPress file found in the main WordPress directory, and is used for remote posting, pingbacks, and trackbacks. Apparently, it is also used to read post data for WordPress’s stat system. The problem is, the stats system was looking for xmlrpc.php in the root directory of my site, but my blog resides in a subdirectory on my server. Since the file appeared to be missing, the correct data could not load, and individual stats would not display.

To solve this problem, I simply copied xmlrpc.php from my WordPress subdirectory into the root directory of my site. I only needed to edit one line, the include statement for wp-load.php. I adjusted the path so it pointed to the actual wp-load.php in my WordPress subdirectory. After doing this, individual stat graphs worked perfectly!

Instead of this method, it might also be possible to use an .htaccess edit to redirect requests for the xmlrpc.php file, but I did not try this. I hope this information might help someone who stores their WordPress blog in a subdirectory and has experienced this same problem. I was unable to find any information about something like this on Google or the WordPress forums.

More information on xmlrpc.php:
https://codex.wordpress.org/XML-RPC_Support
https://digwp.com/2009/06/xmlrpc-php-security/

How to Add a Double Outline Style Around Text in Photoshop

The easiest way to add a single outline to a text layer in Adobe Photoshop is by applying a Stroke to the text in the Layer Style options. But since only one stroke per layer is allowed, how can you add a double outline, or a double stroke? It turns out you can get nearly the same effect by clever use of the Outer Glow style, in addition to the Stroke style. To add a double outline to a text layer, do the following:

  1. Create your initial text layer. I used 48pt Arial for my example.
  2. Create the first outline. Go to Layer > Layer Style > Stroke. Select your desired size and color. Make sure the Position is Outside, Blend Mode is Normal, and Opacity is 100%.

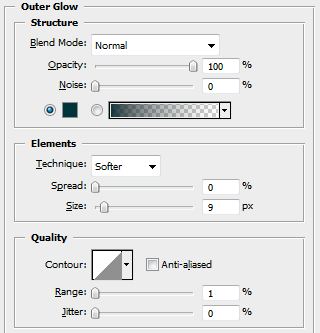
  3. Now add the Outer Glow effect. Click Outer Glow in the Styles list in the Layer Style window. Set the Blend Mode to Normal and Opacity to 100%. Select the color you want for the second outline.
  4. Adjust the Size to any desired number, but make sure it is larger than your previous Stroke size.
  5. Reduce the Range setting to a low value, somewhere between 1%-5%. A lower value will make the second outline appear more crisp, while a higher value will blur the outer edges slightly.

When the proper settings are adjusted, the Outer Glow acts as a second stroke. You now have a double outline around your text!

Convert a Video File into an Animated .GIF with Photoshop

It is popular nowadays to create short animated GIFs out of video or movie clips for easy viewing in forums and blogs. With some of the animation features in recent versions of Adobe Photoshop, it is quite easy to create these yourself!

  1. Open up your video file in Photoshop (File > Open). Photoshop can read in a number of different video formats (MOV, AVI, MPG, MPEG, MP4, M4V). If your video file is not one of these, you will need to convert it using a different program.
  2. Open the Animation palette (Window > Animation). You should see a timeline of your video in the palette.
  3. Set the start and end points of the clip you want to convert. Drag the blue handles above the timeline (shown circled in red in the image below) to select the duration of your clip. In the Animation palette menu (found at the top right corner of the palette), click Trim Document Duration to Work Area. If you want to convert the entire video into an animated GIF, then this step is not needed.
    Animation Timeline View
  4. Back in the Animation palette menu, click Flatten Frames Into Layers. A layer will be created for each frame of the video. You then need to delete the original video layer. In the Layers palette, right click on the original layer (which has a video clip icon in its thumbnail, and is probably called “Layer 1”), and click Delete Layer.
  5. Next, click Make Frames From Layers in the Animation palette menu.
  6. Finally, go to File > Save for Web & Devices. Make sure the format is set to GIF. On the bottom right corner of the window there is a drop down for Looping Options, which allows you to make the GIF loop once, forever, or a specific number of times. Click Save and you are done!

Your have successfully converted a video into an animated GIF! This has been tested in Photoshop CS4 and Photoshop CS5.

How to Paste Transparent GIF or PNG Images into Photoshop

When copying and pasting transparent GIF or PNG images from the internet into Photoshop, the transparent areas of the image may be converted into black. The problem is that transparency is not recognized during the copy/paste command, and so, the transparent areas default to black. How can this be avoided?

Incorrectly Pasted

Correctly Pasted

Method 1: Save the image first.
The simplest way to get around this problem is to simply save the image from the web to your hard drive, instead of copying it. Once the actual GIF or PNG image file is on your hard drive, you can easily open the file in Photoshop. The transparency will be recognized, and you can copy/paste within Photoshop into other open files as needed.

Method 2: Manually remove the black.
Another possibility, although more complicated, is to manually delete the black area after pasting from the web. This is not a good idea if your image already has black in it. Go to Select > Color Range, make sure the Select drop down is on “Sampled Colors,” and then use they eyedropper tool to select an area of the color black which you wish to remove. Turn the Fuzziness down to 0, and click OK. Now simply hit the Delete key to remove the selected black area. Be careful! If your original image has any black pixels in it, these will be removed as well, because after the transparency gets converted to black there is no way to tell the difference. Method 1 is guaranteed to keep the original image intact, but it is useful to know all the options!