How to Add a Double Outline Style Around Text in Photoshop
The easiest way to add a single outline to a text layer in Adobe Photoshop is by applying a Stroke to the text in the Layer Style options. But since only one stroke per layer is allowed, how can you add a double outline, or a double stroke? It turns out you can get nearly the same effect by clever use of the Outer Glow style, in addition to the Stroke style. To add a double outline to a text layer, do the following:
-
Create your initial text layer. I used 48pt Arial for my example.

-
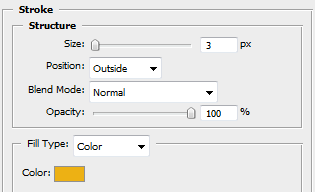
Create the first outline. Go to Layer > Layer Style > Stroke. Select your desired size and color. Make sure the Position is Outside, Blend Mode is Normal, and Opacity is 100%.


-
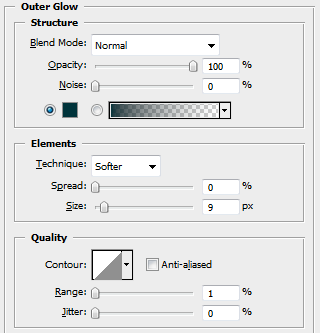
Now add the Outer Glow effect. Click Outer Glow in the Styles list in the Layer Style window. Set the Blend Mode to Normal and Opacity to 100%. Select the color you want for the second outline.
-
Adjust the Size to any desired number, but make sure it is larger than your previous Stroke size.
-
Reduce the Range setting to a low value, somewhere between 1%-5%. A lower value will make the second outline appear more crisp, while a higher value will blur the outer edges slightly.


When the proper settings are adjusted, the Outer Glow acts as a second stroke. You now have a double outline around your text!
4 comments
This blog helped me alot.. Thank you so much JAZAKALLAH..:)
Very helpful Thank You!
Exactly what I was looking for. thanks a bunch :-)
Thank you so much!!!!!
Comments are closed.