In my previous post on how to make an animated GIF in Photoshop, a common question in the comments was how can you add the transition effect of fading from one image into the next?
Original:
With a Fade Effect:

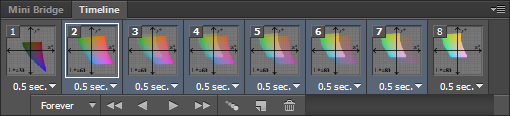
- Set up your animation frames in the Timeline palette (known as the Animation palette in versions prior to CS6). See my earlier post for instructions.
- Select the animation frame that you want to start the fade effect.
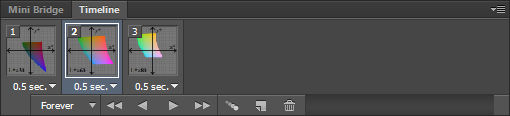
In the Timeline palette menu (found under this button at the top right corner of the palette: ), click Tween…
 - In the box that pops up, make sure “Tween With: Next Frame” is chosen, so that the frame you selected will fade into the following frame. Under “Frames to Add” pick the number of new frames you want to add in between the current frame and the next frame. A larger number will make a smoother transition, but will result in a bigger file size. Make sure “All Layers” is chosen, and at least “Opacity” is checked. Click OK
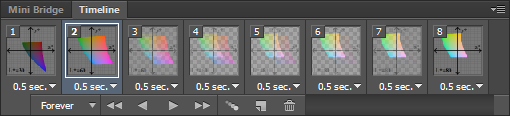
New frames will be added in between the frame you selected and the following frame. The opacity of each layer is gradually transitioned from 100% to 0% and 0% to 100% respectively. This provides a good start, but one problem with this is that you can see the underlying transparency in the newly added frames, which will artificially brighten the image since there is no background layer. This is not what we want. Instead, we want the initial frame to have an opacity of 100% over the course of the tween, as the following frame gradually fades in. This can be manually edited for each frame in the Layer palette, but let’s avoid doing so: - In the Timeline palette menu, uncheck New Layers Visible in All Frames
- Click on your original initial frame to select it. Shift+Click the last of the newly added in between frames. This will select all of the in between frames, while still leaving the initial frame as the “main” selected frame, which is important for the next step.
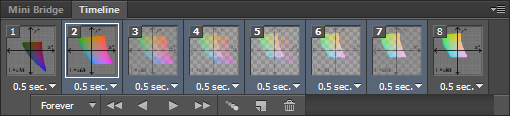
- In the Layer palette, right click on the layer corresponding to the image in the initial frame (it should have 100% opacity). Click Duplicate Layer and then OK. This will copy your initial frame image to each of the in between frames at 100% opacity, which will make it appear that the next frame is fading in.
- Change the timing of each frame if needed, click File > Save for Web & Devices, make sure the file format is set to GIF, and save the image!
You can repeat this for each set of two adjacent frames that you want to fade in or fade out of each other. In the Tween dialog box, there are a number of other options which can be used to add effects such as position changes, which can be experimented with.
Tested with Adobe Photoshop CS6, but should also work in Photoshop CS4 and Photoshop CS5