Sort iTunes Library by Artist, then by Album Year

I keep my iTunes library sorted by Artist alphabetically, but when you click the Artist heading, the Album column gets sorted alphabetically as well. I recently discovered a trick to sort Albums by Year within each Artist group, while keeping the overall Artist order alphabetical.

Simply click the Album column heading twice. The heading will rotate from “Album” to “Album by Artist” and then “Album by Year.” This will sort the iTunes Library by Artist, then by Year. The following is a summary of the different combinations:


  1. Sort by Artist alphabetically, then Album alphabetically.

  2. Sort by Album alphabetically.

  3. Sort by Album Artist alphabetically (or Artist if Album Artist is blank), then by Album alphabetically.

  4. Sort by Album Artist alphabetically (or Artist if Album Artist is blank), then by Album chronologically.

For compilation albums things get a little confusing. The Album Artist is not always the same as Artist, so it is important to remember that for the last two options, these will be listed according to Album Artist. Also, if the Album Artist is blank, but the album is marked as a compilation, these songs will be found at the end of the library.

It is nice to have Albums listed chronologically within each Artist!
How to Create an Animated .GIF in Photoshop CS5, CS6 & CC

Let’s say you have a folder full of images that you want to sequence together as frames in an animated GIF. You can find special programs online to do this, but with some of the new features of Adobe Photoshop, it’s quite fast and simple.

  1. Gather the images you want to animate into one folder.
  2. Click File > Scripts > Load Files into Stack. When the “Load Layers” window pops up, click Browse to select & open your image files, and then click OK. This should import the files you selected as individual layers in your document. Rearrange the layers into the correct order, if necessary.
  3. This next step differs depending on what version of Photoshop you have:
    • For Photoshop CS5: Open the Animation palette (Window > Animation).
    • For Photoshop CS6: Open the Timeline palette (Window > Timeline ).
    • For Photoshop CC (Creative Cloud): Open the Timeline palette (Window > Timeline ). In the middle of the palette, you will see a button with a drop-down allowing you to choose either “Create Video Timeline” or “Create Frame Animation.” You want to choose & then click the Create Frame Animation button.
  4. In the Animation/Timeline palette menu (found under this button at the top right corner of the palette: PsPaletteMenu), click Make Frames From Layers. You can also click Reverse Frames if needed. This will take each layer in your document and set it as an individual frame in the animation.
  5. Now we will change the duration of each frame. Make sure you are in frame view, not timeline view. If you do not see thumbnail icons of all your layers in the Animation/Timeline palette, click the icon in the lower right corner (the hover text will say “Convert to Frame Animation”). Now, back in the Animation/Timeline palette menu, click Select All Frames.
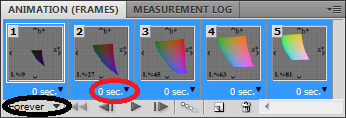
  6. Click the drop down button just underneath each frame image (circled in red in the image below). This will bring up a menu where you can set a duration. Since all frames are selected, all frames will be set to the same time. Each frame can be changed individually, if desired.
  7. The drop down button circled in black in the image above will change how many times the animation will loop; either a fixed number of times, or forever.
  8. Once the frame order and timing as been set up, it is time to save the image! Click File > Save for Web & Devices, make sure the file format is set to GIF, change any other options if needed, and save the image!

You will now have an animated GIF taken from a folder full of the individual frames. In fact, as long as each frame exists as a separate layer in Photoshop, the Animation/Timeline palette can be used to create the GIF. But, with CS5, CS6, or Creative Cloud (CC) it is easy to make separate layers from a folder of the individual frames as described.

If you want to add a transition effect to fade one frame into the following frame, please see my other post, Fade In & Fade Out an Animated .GIF in Photoshop.

How to select the same sub-objects in multiple copies of a group in Adobe Illustrator

Grouping in Adobe Illustrator is a useful tool to “bundle” objects that need to be moved around together. Groups can also easily be duplicated to create multiple instances of a set of objects. However, what if you needed to change a property of one particular object within all copies of a group? There is no easy way to select all sub-objects of the same type. If you are editing within a group, you might try Select > Same > Appearance, but this will only select objects within the current group, and will not expand the selection to other copies of that group. In the Layers palette, you might be able to select the specific sub-objects you want inside of each group, and then perhaps save the selection for use later (Select > Save Selection). But this can be tedious, especially when there are a large number of group copies.

The simplest solution I found to selecting identical objects within multiple copies of the same group involves use of actions and the Note feature in Illustrator. This must be done before copies of the original group are created.

  1. Open the Attributes palette (Window > Attributes)
  2. Begin editing within your original group and select the desired sub-object
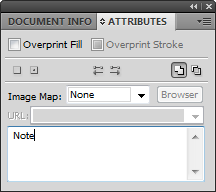
  3. In the palette options drop down, click “Show Note” if it isn’t visible already.
  4. The attributes palette should now have a white text box on the bottom.
  5. Type a name for that object into the Notes box which you will use later to refer to this object type.
  6. Open the Actions palette (Window > Actions)
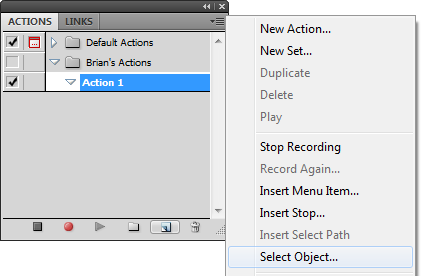
  7. Start recording a new action by clicking the “Create New Action” icon on the bottom of the Action palette, next to the trash can. The action should begin recording automatically.
  8. Now click the palette options drop down in the top right corner, and click “Select Object”
  9. Type in the note text you used earlier in the object attribute palette.
  10. Stop recording the action by clicking the square.

This procedure creates an action which selects objects with the same note text, no matter what group they belong to. Now, you can duplicate your group as many times as you want. Running the action (by clicking the “play” icon when selected in the Action palette) will now select all of the same sub-objects in every instance of the duplicated group. This way you can easily modify each one at the same time!

Setting Note text for objects is an easy way to select specific sets of items later, but it is particularly useful when dealing with objects within groups. This tutorial was written with Adobe Illustrator CS4, but the method should work for other versions similarly.

Clear Unread SMS/MMS Icon on Palm Treo Pro

Every now and then on my Treo Pro, the unread SMS notification icon gets “stuck” on the default time screen that shows when the backlight turns off or when the power button is hit. My Today screen will show “No unread messages” but I will still see the icon which should let me know there are unread texts. There is a simple registry fix I used to clear this. If you don’t have a registry editor on your phone, PHM Registry Editor is a good one.

If you are sure you really have zero unread messages, go to the following registry locations:

HKEY_Current_User\System\State\Messages\MMS\Unread
HKEY_Current_User\System\State\Messages\sms\Unread

In each location, there will be a key titled “Count.” Change these values to zero. In my case, the key for MMS was set to 4294967295 (0xFFFFFFFF in hexadecimal, or, -1 in two’s compliment), which clearly is an erroneous value. Once I changed this number back to zero, the unread notification icon disappeared!

Remove Arrow Links in iTunes 9 & 10 for Windows

Back in iTunes 8, Apple removed the preferences option to disable the arrow links to the iTunes music store next to the name and artist of a highlighted song. I find these highly annoying, since I never intend to use them. For the Windows version of iTunes, I found two different ways to get rid of these arrow icons:

Method 1
Go to Edit > Preferences > Parental Control, and check “Disable: iTunes Store”

While this is the simplest way of getting rid of the arrows, in the latest versions of iTunes, disabling the iTunes Store also disables Genius and automatic album art downloading. If you use these features, like I do, disabling the iTunes Store altogether is not an option. In this case, there is another way:

Method 2
Follow the instructions found here. Basically, you first close iTunes, then with a text editor open C:\Documents and Settings\UserName\Application Data\Apple Computer\iTunes\iTunesPrefs.xml on Windows XP, or C:\Users\UserName\AppData\Roaming\Apple Computer\iTunes\iTunesPrefs.xml on Windows Vista and Windows 7. Make sure to replace UserName with your own Windows user name. After the following lines:


User Preferences

add the code:


show-store-arrow-links

AA==

When iTunes is reopened, the arrow icon links will be gone! Since I use Genius and downloading album art, I used the second method and it works great in both iTunes 9 and iTunes 10!

Update: I have also posted how to remove the Ping dropdown menu in iTunes 10 for Windows as well.